gr-APRS - A GNU Radio Block for Receiving APRS
GNU Radio Hierarchical Block(s) to Test and Receive APRS Packet (with examples). Tested on GNU Radio v3.10.
(– FINALLY UPDATED AFTER 8 YEARS !!! –)
As of February 2026:
- All of the codes are rebuilt with GNU Radio V3.10 and python3
- The Python files used in the Python Block are consolidated into a single file.
- Added APRS I-Gate code.
![]()
Dependency
- GNU Radio. Please check out https://www.gnuradio.org/ or Their GitHub repo
Installations
This OOT Module is built upon the GNU Radio hierarchical block scheme. The hierarchical block itself is “transparently” built graphically / visually using GRC. The hier blocks are provided in the gr-APRS/HierBlock folder. Installation steps :
- git clone https://github.com/handiko/gr-APRS.git
- cd gr-APRS/HierBlock/.
- AFSK_Demod.grc AFSK_Demod.grc should be installed first.
- Click RUN (F6) button on GNU Radio companion (It will do nothing in the foreground, since it will just build and install the Hier Block silently). Then Close.
- APRS_Rx.grc APRS_Rx.grc should be installed after AFSK_Demod.grc.
- Again, Click RUN (F6) button and then Close.
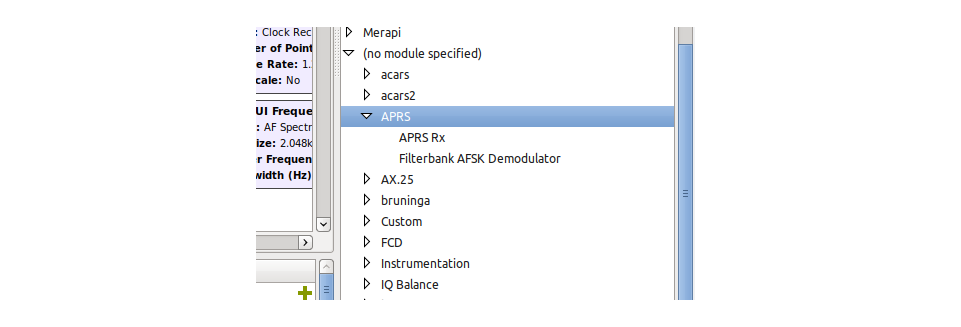
- Open the GNU Radio. The new Hier Block will be listed under the APRS module.
Finish, and now you can open GRC files on gr-APRS/Examples/ or gr-APRS/TestScripts/ and run them.
About the HDLC to AX.25 block
This block, which functions to convert HDLC data into TNC2 APRS formats, is constructed from the “Python Block,” which is native to the GNU Radio Companion. To build one yourself:
- From the GNU Radio Core module, under Misc, add a Python Block into your flowgraph.

- Double-click that block to open the properties and then click Open in Editor. If you then asked about which editor to choose, just select the default or any editor you prefer.
- In the editor, copy and paste python code from gr-APRS/Module/epb.py, save, close, and hit OK.
- Now your Python Block should be turned into HDLC to AX.25 Block, have message i/o ports which are labelled as “hdlc in” and “ax25 out”.

APRS-IS I-Gate
This block, which uploads the TNC2 APRS sentence to APRS-IS, is constructed from the “Python Block,” which is native to the GNU Radio Companion. To build one yourself:
- From the GNU Radio Core module, under Misc, add a Python Block into your flowgraph.
- Double-click that block to open the properties and then click Open in Editor. If you then asked about which editor to choose, just select the default or any editor you prefer.
- In the editor, copy and paste python code from gr-APRS/Module/igate.py, save, close, and hit OK.
-
Now your Python Block should be turned into an APRS-IS I-Gate Block, with message input port which are labelled as “pdu in”.
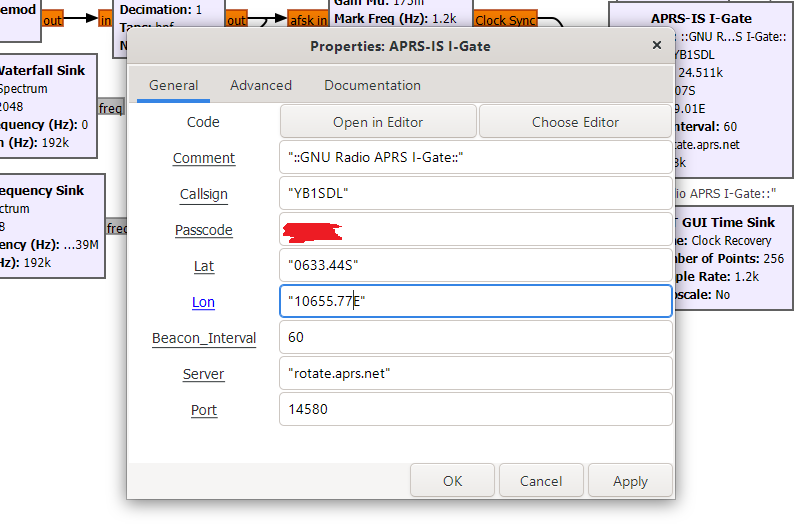
The parameters:
- Callsign: Your callsign should be enclosed with “ “, example: “YB1SDL”
- Passcode: Your APRS-IS passcode
- Lat: DDMM.SS format. Should be enclosed with “ “, example: “0633.44S”
- Lon: DDDMM.SS format. Should be enclosed with “ “, example: “10655.77E”
- Beacon interval: in seconds
- Server: default: “rotate.aprs.net”
- Port: default: 14580
- Comment: custom: “Your comment here.”
Hier Blocks
All the hier blocks are constructed graphically using GNU Radio Companion. AFSK Demod hier block is required by the APRS Rx hier block (hier block which contains another hier block within), so it should be installed first.
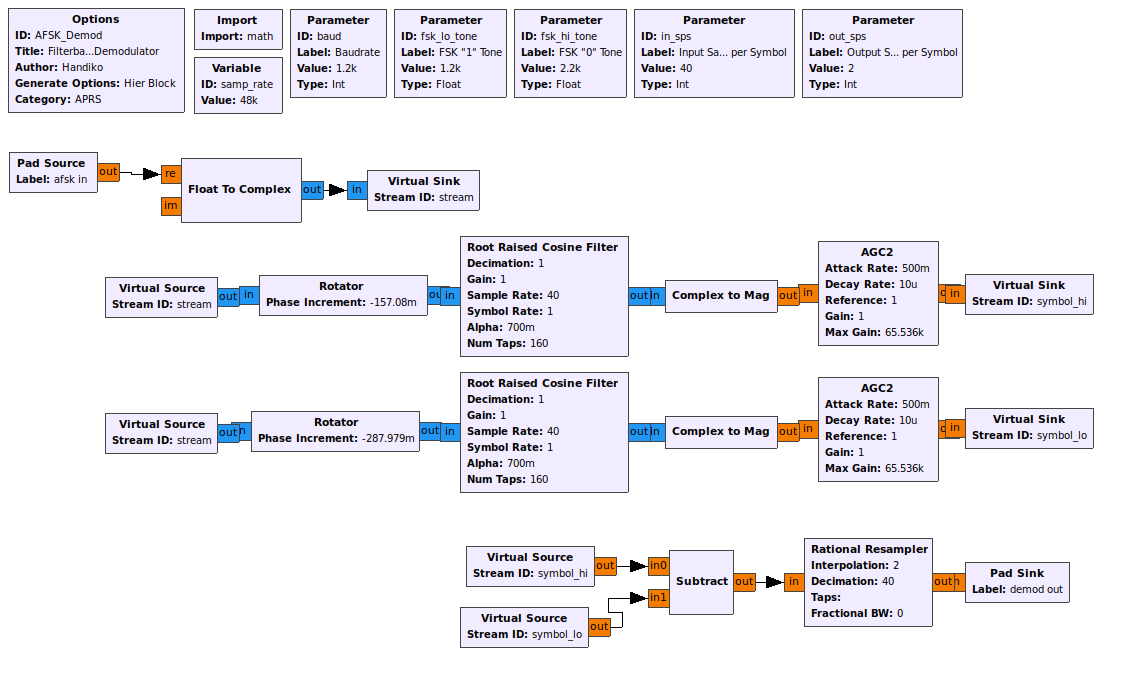
AFSK Demod
APRS Rx

Examples
There are some grc examples included in gr-APRS/Examples and gr-APRS/TestScripts folder. WAV files are also included in the gr-APRS/WAV for testing purposes.
A Few notes:
- AFSK Demod hier block (Filterbank AFSK Demodulator) is recommended to run with input samples per symbol (integer) of at least 20 and must be a value of input sample rate divided by baudrate (integer). For example, at baudrate of 1200baud, if you run at the minimum recommended samples per symbol of 20, then the input sample rate must be 24kHz (24kHz / 1200baud = 20 sps).
- The output of the APRS decoder (HDLC to AX25 block) is sent to the Socket PDU Block. To examine this output, you can open a terminal and run
telnet localhost 52001. The image below shows the output using the terminal, where the transmitted messages are some random strings under experimental data type (,data type) for testing purposes.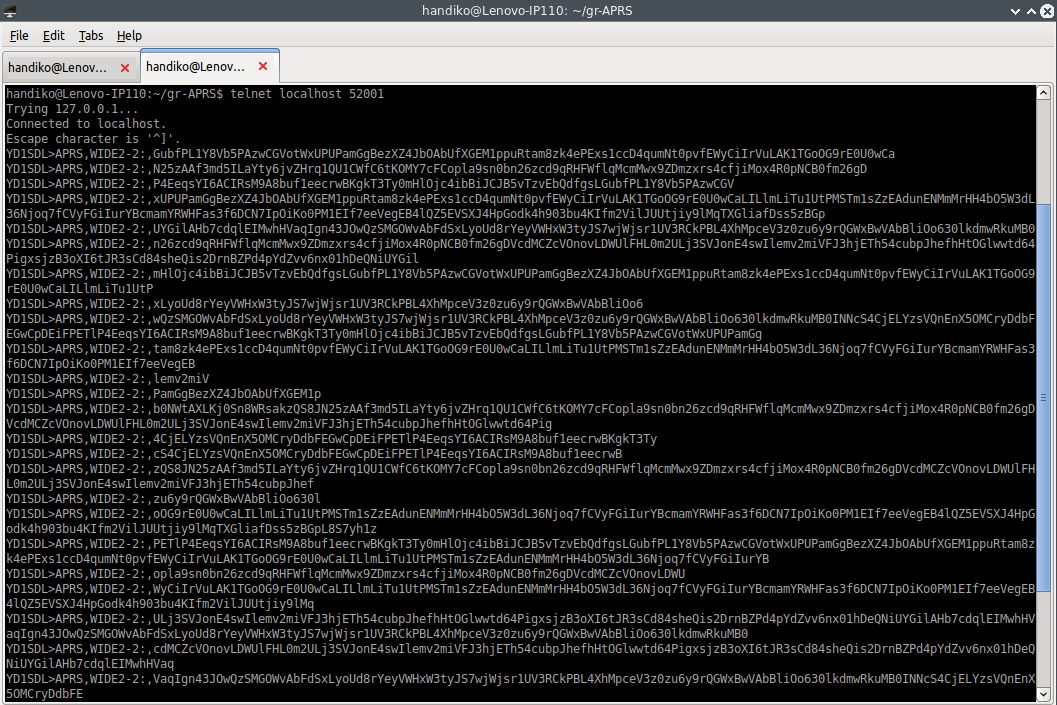
APRS RX RTL
From gr-APRS/Examples/APRS_RX_RTL.grc. This example uses the low-cost RTL-SDR dongle to receive the APRS signal on 144.390 MHz (for another frequency, please change the frequency in the grc).
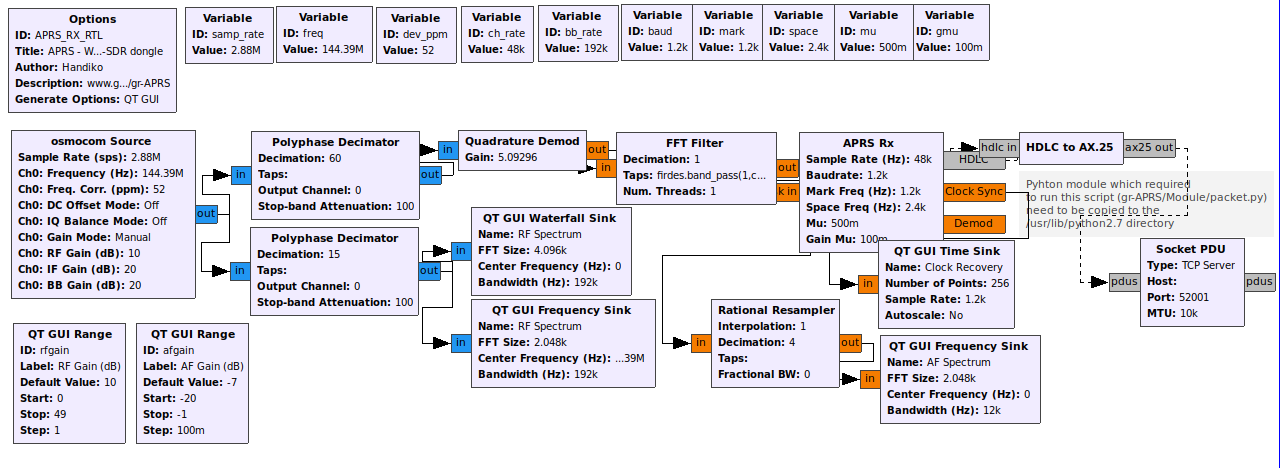
PLEASE MAKE SURE YOU PUT THE PROPER CALIBRATION VALUE (PPM) IN THE OSMOCOM-SOURCE BLOCK. IT COULD BE DIFFERENT FROM DEVICE TO DEVICE. MINE IS 55-60 PPM (OR THEREABOUT)
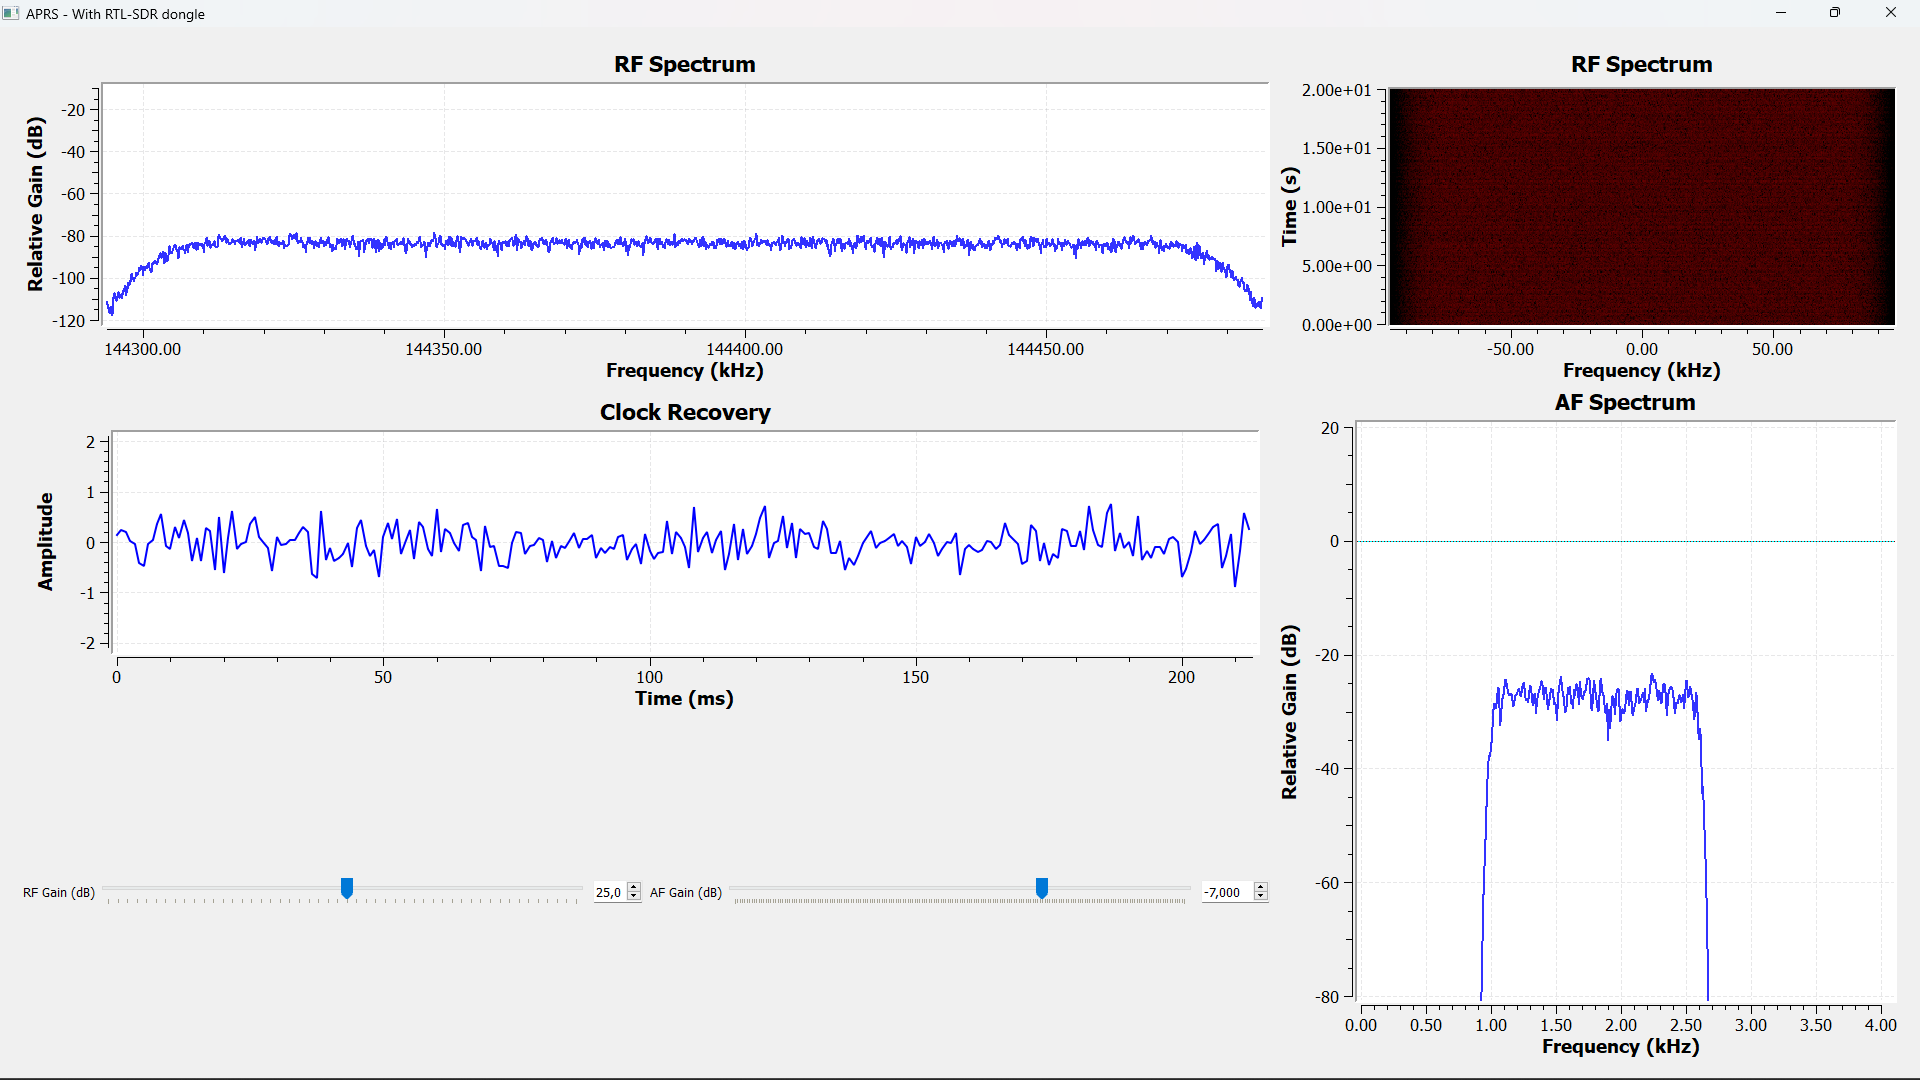
The dashboard:
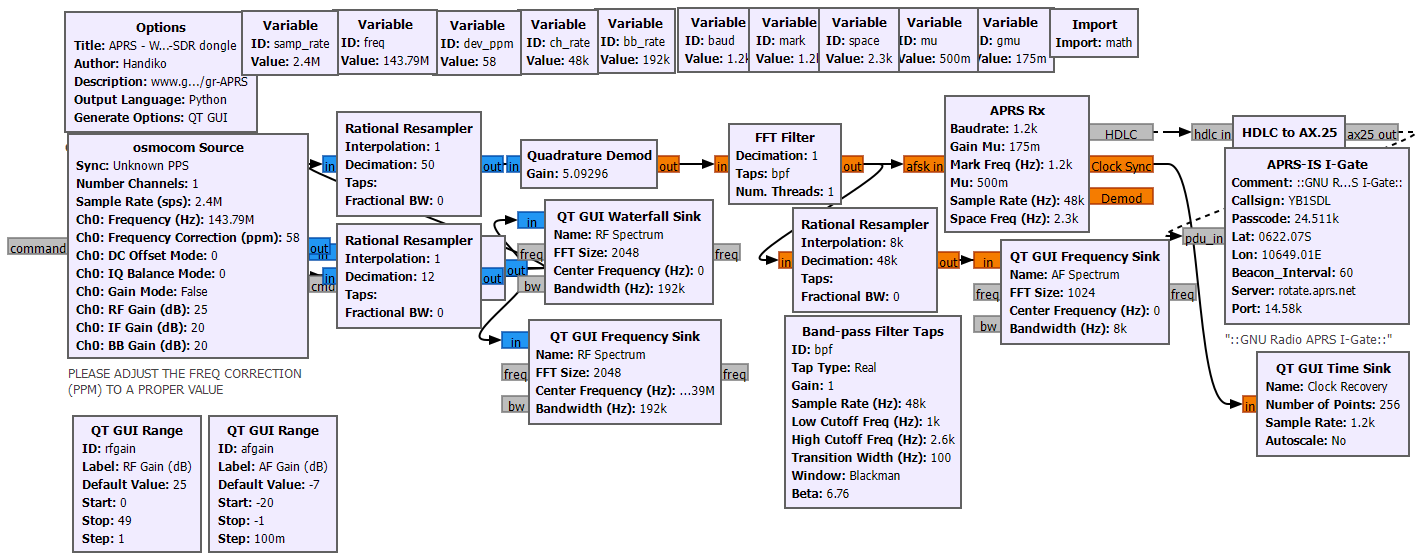
APRS I-Gate
From gr-APRS/Examples/APRS_IGATE_RTL.grc. This example uses the low-cost RTL-SDR dongle to receive the APRS signal on 144.390 MHz and upload it to APRS-IS (functions as an I-Gate).
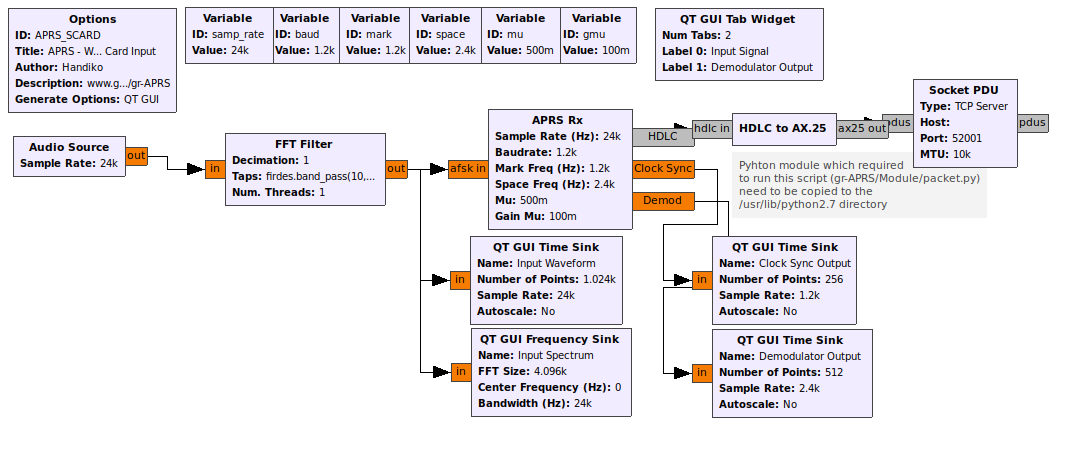
APRS SCARD
From gr-APRS/Examples/APRS_SCARD.grc. This example uses the onboard sound card with a VHF Radio receiver. Audio from the Radio SPK output should be fed into the MIC input of your soundcard.
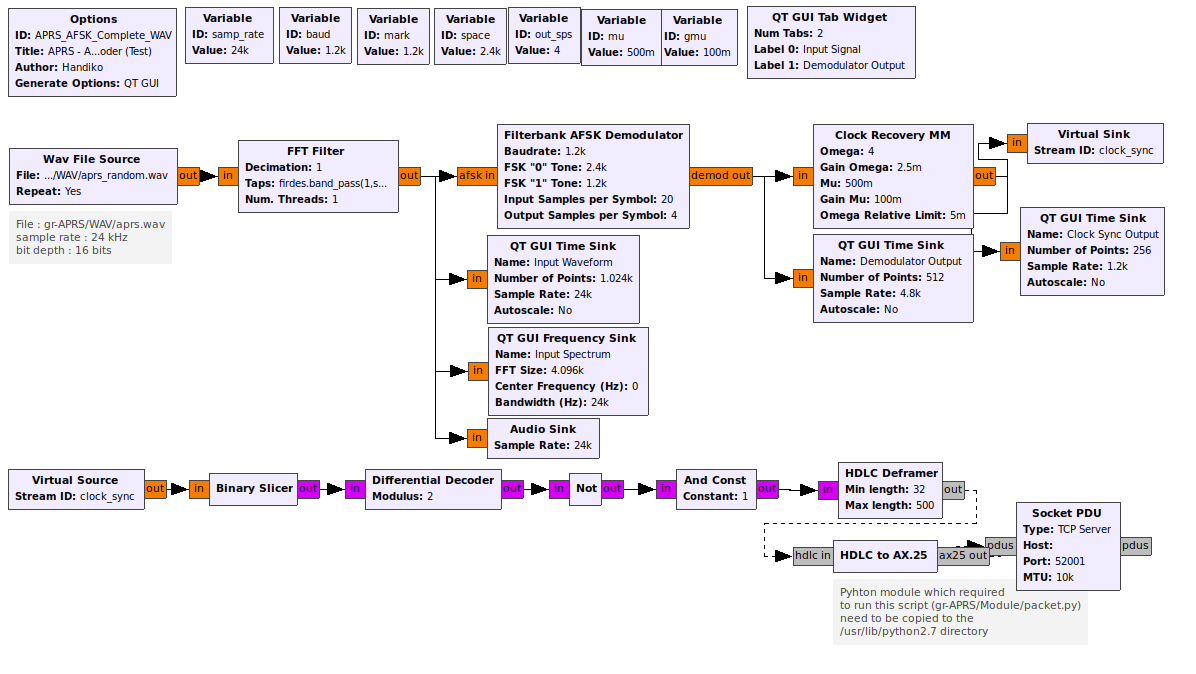
APRS AFSK Complete WAV
From gr-APRS/TestScripts/APRS_AFSK_Complete_WAV.grc. These examples will decode AFSK audio files, which are included in gr-APRS/WAV. This example is mainly for testing purposes (for example, to find the best values of Mu and Gain Mu).
TODO
- Bundle up all the codes using gr_modtool
- Optimizing AFSK Demodulation and Clock Sync process
- Tidy up this README file a bit :)
Acknwoledgement
- WB2OSZ for which the AFSK Demod scheme is pretty much based on their excellent work.
- Bob Bruninga and
- Dani Estevez for the clock synchronization method.
Contributing
- Fork it https://github.com/handiko/gr-APRS/fork
- Create new branch (
git checkout -b add-blah-blah) - Do some editing / create a new feature
- Commit your works (
git commit -m "Adding some blah blah blah..") - Push to the branch (
git push -u origin add-blah-blah) - Create a new Pull Request